Wednesday, November 6, 2013

Holiday Gift Ideas

Its already November. Where have I been? I haven't posted anything since September! Yikes. I've been busy with wedding stuff and I started a part time job so blogging has been put on the back burner. But I am back and I have some awesome things to share.

I have decided to open up my "Holiday Boutique." Which basically means I make stuff and sell it. I will make some more goodies that will be for sale like wreaths, signs, decor and more jewelry within the next week. But for now, here are the goodies I have to offer.

 Elastic Hair Ties $5 for 5

 Fabric Coffee Cozy $10 (different fabric available)

 Wire Words/Wire Bow
Necklace $25
Bracelet $15

 Tear Drop Earrings $15

 Cabochon and Sea Foam Earrings $20

 Gold Bar Necklace $20

 Turquoise and Gold ID Bracelet $15

 Mini Heart Midi Ring $8

 Cabochon Flower Studs $5

Initial Necklace $20

There are a lot more fun and crafty items coming! I'm taking orders now. Let me make your Holiday shopping easier.

Monday, September 23, 2013

DIY Makeup Brush Roll

I was in a wedding this past weekend and I needed a way to take my makeup brushes with me. I didn't want to lug around two extra makeup bags full of brushes so I got an idea. I'll make a travel case! I'll show you how I made mine.
 
Things you'll need:
Fabric (I used two patterns)
Matching thread
Sewing machine
Scissors
Ruler
Fabric pen or chalk
Ribbon
Iron & Ironing Board
 
Cut one piece of fabric 7"x15". Cut two pieces of fabric 13.5"x15".
Take the 7"x15" piece, fold the top down (toward the back) 2" and iron.

Turn the piece so the right side of the fabric is up. Mark where you want your pockets to be, 2.5"-1" works well.

Place your 7"x15" piece on top of a 13.5"x15" piece, pin in place.

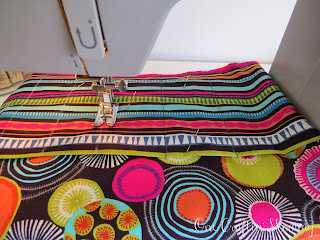
Sew seams straight down to create your pockets.

After all of the pockets are sewn, place the other 13.5"x15" piece, right sides, together with your pocket piece.

Cut two pieces of ribbon 18" long and pin in place.

 Sew along all sides making sure to leave about 2" open on the top.

 Turn your roll right side out and iron.

Top stitch around the entire roll.

Arrange your brushes in the roll and you're done!


I hope this wasn't too confusing to follow. If it was just let me know and I'll make one for you so you don't have to follow my lame directions at all!

Happy Monday!

Sunday, September 8, 2013

Homemade Cookies 'n Cream

I think my son had the idea that if we made our own ice cream, it would be much healthier than buying it from the store. So I started looking up some easy recipes and came up with a quick and simple ice cream recipe. 


Cookies 'n Cream
2 C heavy cream/whipping cream
1 C sweetened condensed milk
1 Tbsp pure vanilla extract

In the bowl of an electric mixer, using the whisk attachment, combine all ingredients and mix on high until creamy and fluffy.


Crush 12 Oreo cookies, not too much. Add to bowl and mix on low for 20 seconds.


Transfer to a freezer safe container and freeze overnight.


 Scoop and ENJOY!


This recipe is super easy. My son helped with each step. Let me know how this turns out for you. They key is making sure the cream-vanilla mixture is very light and fluffy, like whipped cream, then being sure not to over mix when stirring in the cookies.

We are making Peaches 'n Cream now. Stay tuned for pictures.

Thursday, September 5, 2013

DIY Pocket Invitation

I'm going to start a series called DIY Wedding. Thanks to Pinterest, wedding planning has been pretty fun. I can use my creativity and crafting skill to do a lot of DIY for my wedding. I decided I'd share it all with you. I've already made a burlap banner and wooden signs but I have a lot more to make so I will document those future projects. My fiance brought home an entire fence a few months ago for me to make the signs we will use at our wedding. I also bought 70 yards of burlap in Downtown Los Angeles a few months back for tables, banners, ring pillow and mason jars. I have a HUGE list of projects that I really need to get crackin' on. 7 months, 13 days to go!

Today I worked on creating a template for a pocket invitation. I got the idea from a friend of mine who is getting married in a couple of weeks. I loved hoe they turned out and you don't have to deal with 100 different envelopes for one invitation. Plus this is something I can totally DIY! I got the measurements from this website and tweaked it a little.

Here it is, somewhat, step by step:

First, I created a template using the measurements from the website linked above. I used printer paper in case I needed to tweak anything. I didn't want to waste good paper.

After I cut the template out, I used my Stampin' Up score board to score at 2.5" and  5"

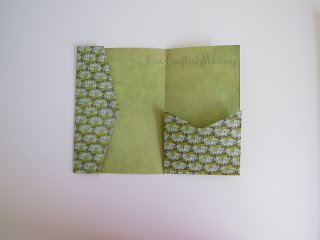
 Here it is after scoring.

 The solid green paper I was using was lame. It cracked where I scored and folded so I grabbed this 12x12 sheet from a Basic Grey paper pad. I added 1/4" on each side of the flap so I can glue those down to create the pocket. (I didn't think of it initially, oops.) 
This is how it turned out.

 That website also gives measurements for the invitation size, mat and inserts.
The kraft paper is the mat piece, 4 3/4" x 6 3/4"
The ivory paper is the invitation, 4 1/2" x 6 1/2"

 This is what the whole things looks like together with the insert and RSVP card.
Insert 3 1/2" x 6 3/4"
RSVP card 3 1/2" x 5"
I am so happy with the way it turned out. I think I will make one or two more variations to see if I like curved lines as opposed to sharp, straight lines or maybe a scalloped edge. I'll post pictures as soon as I finish them!

Thanks for stopping by! Come back soon to see more DIY Wedding and idea posts!


Wednesday, August 28, 2013

Etsy shop?

I had an Etsy shop a couple of years ago. I was so excited to finally get my shop up and running because I had been thinking about starting the "business" for a while. I made a ton of cards and listed them in my shop. Right before Christmas 2011 I had one sale. A set of personalized Pirate Thank You cards! I was so excited and then totally bummed. It was my first and last sale. I thought maybe my merchandise wasn't good enough. Well, since I LOVE crafting and creating, I continued making jewelry and cards mostly, but stopped listing my pieces on Etsy.

By December 2012 I had so much jewelry made. I decided to bring my jewelry in to work to see if maybe a couple of my coworkers would like to buy some to give as gifts. I was wiped out clean. I had orders coming in everyday. I made over $100, I gave them really good prices. I knew then that my merchandise was awesome and that there are people that would love it and do love it. Since then, I've been debating on whether or not to open up shop again. They've raised their listing cost and also take a percentage of your sales...so will it be worth it? People tell me to start my own website but I haven't looked too much into that. Since I am still at home, jobless, I figured it is a great opportunity for me to start building up my inventory to get my "business" running again. I still need to do my research on getting a website. I have so many things in mind. I already have a list of Halloween decor items that I am going to try to sell and after Halloween I can get started on Christmas; cards, banners, decor, jewelry, handmade gifts, the list goes on. I am really hoping to succeed in this. Alex, my fiance, and I want to start trying for a baby after the wedding so having my own web based business would be really great.

Here are some pieces I've been working on. I have a couple more that I am working on now so I will try to post those tomorrow.

Gold Bar Necklace


Turquoise ID Bracelet


Mini Heart Knuckle Ring


Flower Stud Earrings


Gold Initial Necklace

I wanted to give them clever/cute names but these will do for now!

Happy Hump Day!